“The list of substances that go into computers is long, and many of the chemicals used, such as beryllium, lead, chromium, and mercury compounds, are toxic or carcinogenic to humans….Computers and consumer electronics products appear to emit BFRs (brominated flame retardants) for some time, and in one recent study, BFRs were found in dust samples taken from dozens of different office environments.”
from Toxic Electronics? PC Magazine
Computers are a lifeline for the chemically sensitive. Many of us commiserate with fellow sufferers in online groups, video chat with friends and family who may be too scented for us to spend time with in person, read newspapers, stream TV and movies, and buy clothes and other products because we can’t go into stores without suffering serious consequences. And yet, computers emit particles and fumes that make them intolerable to sit in front of or have in our houses.
I built a glass-fronted box for my computer that is connected to a 3” diameter duct that goes through the wall, venting the computer’s challenging chemicals outside. A quiet duct fan inside the box helps to continually move the air out through the duct. If you are not building a house and installing a duct through the wall, you can still vent out through a window using a window dryer vent product like this one:

Venting outside is important not just to vent the fumes, but to keep your computer from overheating. This is unfortunately one of the challenges of a computer in a box. For this reason, even if you have a smaller computer, I would build this larger size box.
Poplar is the safest wood for me, but if you cannot tolerate wood at all, consider putting a couple coats of AFM Safeseal on the box. Many chemically sensitive people use their products successfully, though I find Safeseal and Polyureseal both require 4 or 5 weeks to air out before I can move pieces sealed with them into my house. You can learn more about their products here: AFM Safeseal
Here is a picture of the box to give you a visual of where we’re headed:
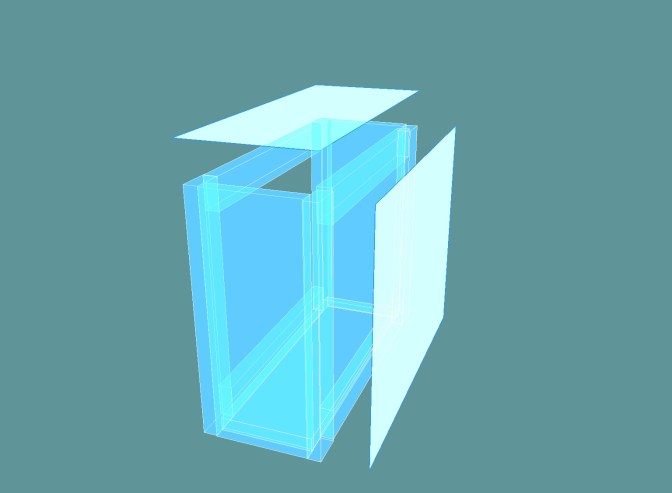
The panels floating above and behind the box are standard aluminum sheet metal (about 10 bucks for a 2’ x 3’ piece at Lowe’s or Home Depot). They are attached to the wood with screws. This step will be explained in more detail later. The glass is mounted on the inside of the box before these pieces of metal are attached.
List of materials:
Poplar (or whatever your safe wood is):
- Front & back frames ¾ x 3½ x 27” 8 pieces
- Sides ¾ x 11¼ x 27” 2 pieces
- Bottom ¾ x 11¼ x 32 ½” 1 piece
Aluminum Sheet Metal: 24” x 36” 2 pieces
- Back 27” x 34”
- Back 6” x 34”
- Top 12 ¾ x 34”
- Glass: 1/8” x 24” x 28 ½”
- Duct Connector for 4” duct
- 4” Flexible Aluminum Dryer Duct Hose
- 2 screw duct clamps (these usually come with the duct hose)
- 2” aluminum tape
- USB powered exhaust fan (sometimes called a cabinet fan)
- Small 6 gallon metal garbage can for your modem
Optional:
- Camera (if you plan on video chatting)
- Computer speakers
- DVD drive
There is special, very clear glass that does not have the greenish tinge of regular glass. Ask if your glass supplier has it or if they can special order it. Request that they do not clean your glass with Windex or any other glass cleaner before giving it to you. (I learned this lesson the hard way.)
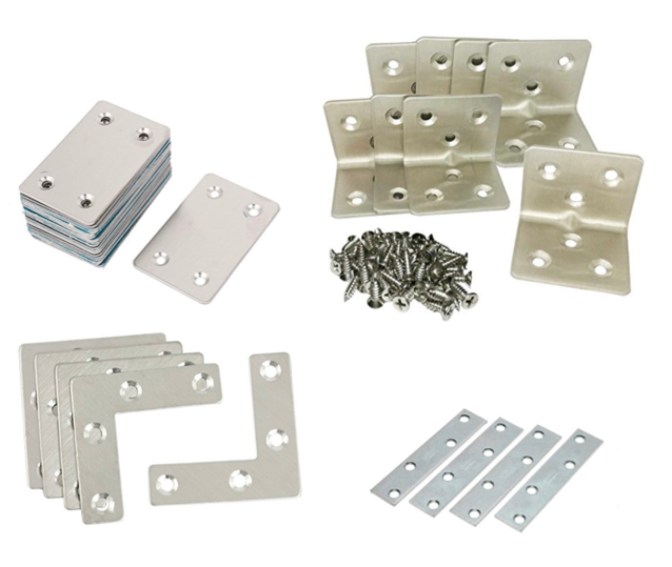
I assembled the box using pocket hole joinery because tight joints can be achieved with this method without the need for glue. It is a very simple form of joinery that is easy to learn and only requires a power drill and a pocket hole jig. (Kreg is the most common brand of pocket hole jig. Many books and YouTube videos are available if you are interested in learning this form of joinery.) If you don’t know how to do pocket hole joinery (or the person you have asked to make the box for you does not), you could easily assemble the box using standard metal brackets like these:
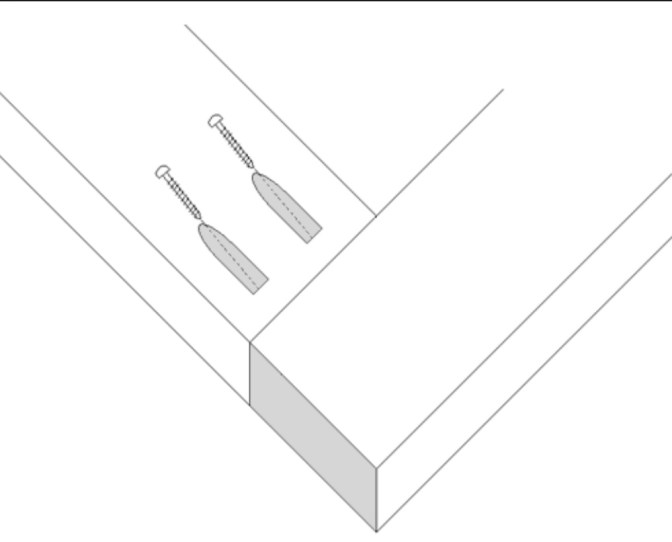
Two pocket holes are cut into each end of the top and bottom wood frame pieces (shown in light brown):

Here is an enlarged diagram of the simple pocket hole butt joint you will be using to assemble the front and back frames:
This is the Kreg pocket hole clamp which is indispensable—it will make screwing your pieces together so much easier. (The project in the picture is not this project.):

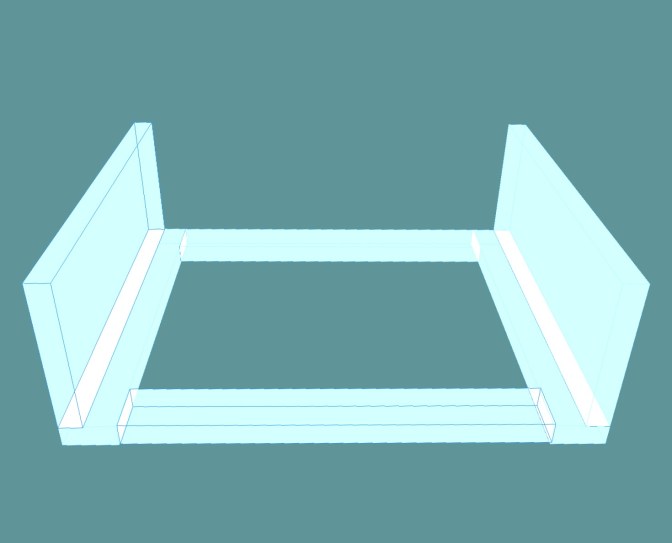
You should have both frames assembled before moving on to the next step:

Before you can attach the sides of the box to the front frame, you have to drill a 1½” hole in one side for the power cords and a hole for your exhaust duct in the other side. My box vents on the right so the duct hole is on that side, but place the duct hole wherever it is convenient for your situation:

Our builder used a 3” duct, but a 4” duct (standard dryer vent size) will allow for more venting and will be easy to find. Some examples of duct connectors:


Take one of your ¾ x 11¼ x 27” side pieces and center the duct connector 6” up from the bottom of the wood and draw a circle around the duct connector. Next, drill a starter hole big enough for your jig saw blade just inside the circle:

Then cut out the circle with a jig saw:

Take your other ¾ x 11¼ x 27” side piece and cut out the 1½” hole for the cords 5” up from the bottom of that piece of wood. (Take a look at your cords and make sure all the ends will fit through a 1 ½” hole! Size up if you need to.) I used a spade bit but a forstner bit would also work if that is what you’ve got.

Next, cut pocket holes in the outside faces of both the ¾ x 11¼ x 27” side boards:


Before attaching the duct connector side piece to the front frame, screw your exhaust fan to the inside of that piece (the side without the pocket holes). The diameter of the actual fan (not including the part with the screws) should be 4”, the same size as your duct. I used a USB powered fan that looks like this:

Clamp one of your side pieces to the front frame, pocket holes facing out. Screw the side into the front frame. Repeat with the other side:
Cut pocket holes into the outside face of the ¾ x 11¼ x 32 ½” bottom piece:

You want tight joints so the computer fumes are contained in the box, so be generous with your pocket holes. Make sure the pocket hole side is facing down and screw the bottom to the front frame and side pieces:

Before attaching the back frame to the sides and bottom, install your glass. Any glass retainer hardware will work for this, but I used the thumbscrew version:

Since you really need zero fumes leaking out, I advocate the additional measure of sealing the edges of the glass to the inside wood of the box and the inside seams with an aluminum tape like Polyken 337. (For some reason, this brand is often recommended to the chemically sensitive. Use whatever is safe for you.) Wear a mask or ask someone to do this for you if you need to protect yourself from the adhesive. You will also be using an aluminum tape to seal the duct connector to the box and to seal around the hole where the electrical cords come out.

Clamp the back frame to the box and screw it to the sides and bottom of the box. Using tin snips, cut one of the 24” x 36” aluminum sheets into a piece 24” x 34” for the back. Cut the other aluminum sheet into two pieces, one 12 ¾” W x 34” L and one that is 6” W x 34” L. You will use this small piece on the back since the box is 27” H and the 24” x 34” piece will not be quite big enough. Lay the back pieces on the back of the box and mark where you will pre-drill holes in the metal every 3”. Using a metal drill bit, place the metal on scrap wood and drill out these holes. Lay the metal sheets on the back and, using ¾ inch wood screws, screw the metal onto the back of the box. Seal the seam with aluminum tape. Seal the inside corners of the back of the box with aluminum tape as well. Next, put the duct connector into the hole you cut in the side and aluminum tape it very well on the inside and outside of the box.
You are now ready to put your computer in the box. Attach all the wires you will be using to the computer (power cord, printer cable connection, keyboard and mouse connections, USB hub wire, etc.) and pull them through the hole you cut in the other side. Plug everything in and turn everything on and make sure all is working correctly before screwing the metal piece on the top of the box.
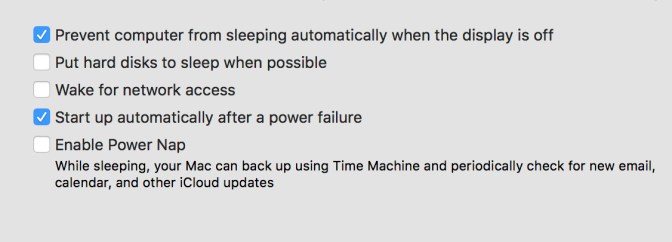
Very important—find the setting that tells your computer to turn itself back on after a power outage and click it so you don’t have to open up the box every time the power goes out. (I learned this the hard way also.) On a Mac it is in System Preferences then Energy Saver (the light bulb icon) then a page that looks like this:
This is optional, but you may want to put a small digital thermometer in the box before closing it up.

This will allow you to monitor the temperature inside the box during warmer months when your computer may be in danger of overheating. My computer has shut itself down while I used it during heat waves and refused to turn back on until it cooled down. (While I stared nervously at a black screen.) I’m pretty sure this is not good for it.
Screw the metal piece to the top of the box using the same method you used to put the back on. I sealed all the top edges with more Polyken 337. Finally, tape the power cord hole completely to ensure computer fumes don’t leak out around the cords. During high winds, I found that hole to be a weak link where fumes were blowing into my office, so here is a picture of how taped up it is now. I pretty much laminated it:

I used very aired out beeswax sheets on top of the tape for added sealing power. (You may not be able to tolerate beeswax so test first.) The ribbon is not decorative. I used it to tie the cords tightly together. Note that many of the cords are wrapped in tape—I found 3M packing tape is low odor and I do not react to it and power cords take forever to air out. If you have a better solution please share it! Taping the cords is very time consuming.
Final step! Attach the duct hose (a metal dryer vent hose works well) to your computer box duct connector tightly and the other end to the duct connector installed in your wall or window.
 These usually come with metal rings to install them but if not, make sure to order them when you are getting the hose and duct connector.
*If you plan to Skype or Facetime with your computer, you will need a camera and speakers on the outside of the box. The speakers are also necessary if you will be watching TV or movies. A DVD drive on the outside of the box can also be handy.
You will need to quarantine the modem as well. You will be told not to do this because of the risk of overheating, but I have done this for years and have not lost a modem yet. I use a small metal garbage can with a lid that I aluminum tape once the modem is in and working. This is a 6 gallon garbage can that is 12”H x 10” W at the top x 9” W at the bottom:

I hope your box allows you many hours of safe (safer?) computing. Email me a picture if you make it—I’d love to see it.
